[TOC]
微服务架构理论入门
微服务概念
提倡将单一应用程序拆分成一组小的服务
每个服务都是一个SpringBoot应用
SpringCloud概念
- 分布式微服务架构的一站式解决方案
版本选型
由SpringCloud版本决定SpringBoot版本。
SpringBoot版本选型
- springBoot官方强烈建议使用2.0以上版本
- 2.2.2.RELEASE
SpringCloud版本选型
springCloud H版本对应SpringBoot2.2.x版本
Hoxton.SR1
Clond Alibaba 2.1.0.RELEASE
停更的影响
- 服务注册中心
- Eureka(×)
- Zookeeper(✔)
- Consul(✔)
- Nacos(✔)
- 服务调用
- Ribbon
- LoadBalancer(✔)
- Feign(x)
- OpenFeign(✔)
- 服务降级
- Hystrix(x)
- Reslience4j(✔)
- Sentinenl(✔ 国内使用)
- 服务网关
- Zuul(x)
- Gateway(✔)
- 服务配置
- Config(x)
- Nacos(✔)
- 服务总线
- Bus(x)
- Nacos(✔)
工程搭建
1 | <packaging>pom</packaging> |
dependencyManagement
- 出现在最顶层的父POM文件中
- 锁定版本,子POM不需要指定版本号就可以使用父POM的版本号,子POM不需要写groupid和version
- 如果子POM指定了具体的版本号,使用子POM的版本号
- 只是声明依赖,并不引入,子POM需要显示声明需要用的依赖
基础pom.xml
1 | <dependencies> |
微服务模块创建
- 创建module(创建完成回到父工程POM查看变化)
- 修改pom.xml
- 写配置文件yml
- 写启动类
- 写业务类
mybatis mapper文件模板
1 |
|
构建时的几个小坑
使用mybatis时,可以在启动类上标记注解@MapperScan来注入Dao,也可以直接在Dao上标记@Mappee注解来将Dao加入到容器中(不推荐使用@Repository,在插入时有时候会出现问题)
mapper.xml的namespace应该与Dao对应
1
<mapper namespace="com.sise.cloud.dao.PaymentDao">
mybatis的配置:
1
2
3
4
5mybatis:
# mapper.xml存放位置
mapper-locations: classpath:mapper/*.xml
# 实体类不用写全限定类名
type-aliases-package: com.sise.cloud.modelmybatis插入时返回主键的写法:
1
2
3<insert id="create" useGeneratedKeys="true" keyProperty="id" parameterType="Payment">
insert into payment(serial) values( #{serial} )
</insert>返回的主键在对应实体的keyProperty中,而不是方法的返回值。方法的返回值是影响行数。
1
2
3
4
5
6("/create")
public CommonResult<Long> create(@RequestBody Payment payment){
Integer row = paymentService.create(payment);
return row != null ? new CommonResult<>(200,"ok", payment.getId())
: new CommonResult<>(500,"create error");
}datasource配置:
注意serverTimezone的大小写。
1
2
3
4
5
6
7
8
9
10spring:
application:
name: cloud-payment-service
datasource:
# 当前数据库操作类型
type: com.alibaba.druid.pool.DruidDataSource
driver-class-name: com.mysql.cj.jdbc.Driver
url: jdbc:mysql://localhost:3306/mcloud?useUnicode=true&characterEncoding=utf-8&useSSL=false&serverTimezone=Asia/Shanghai
username: root
password: 123post方法传递json数据时,后端记得加上@RequestBody注解
devtool热部署
- 添加maven依赖(子POM)
1 | <dependency> |
- 在pom文件中添加maven-plugin(父POM)
1 | <build> |
- enabling automatic build

- ctrl + shift + alt + /
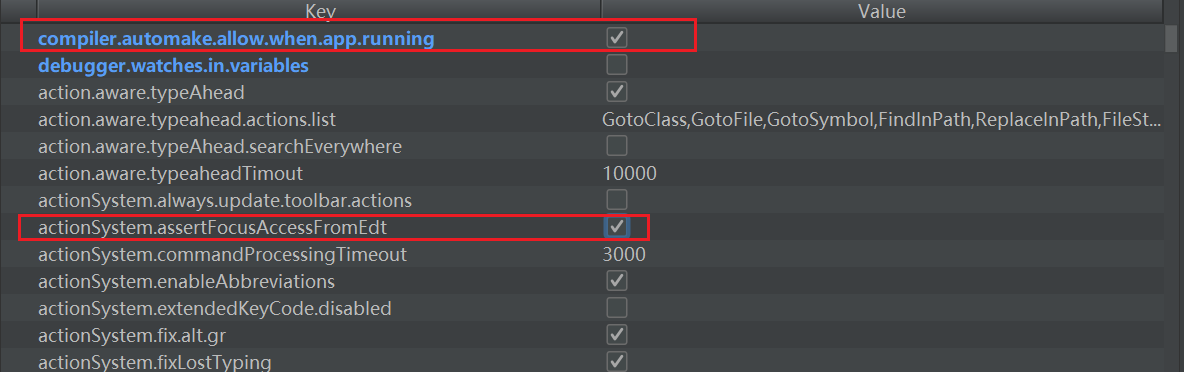
Run Dashboard的配置
在项目的存放路径下.idea目录下,有一个workspace.xml,找到RunDashboard的选项,添加配置
1 | <component name="RunDashboard"> |
重启idea后,再次run项目就出现了。
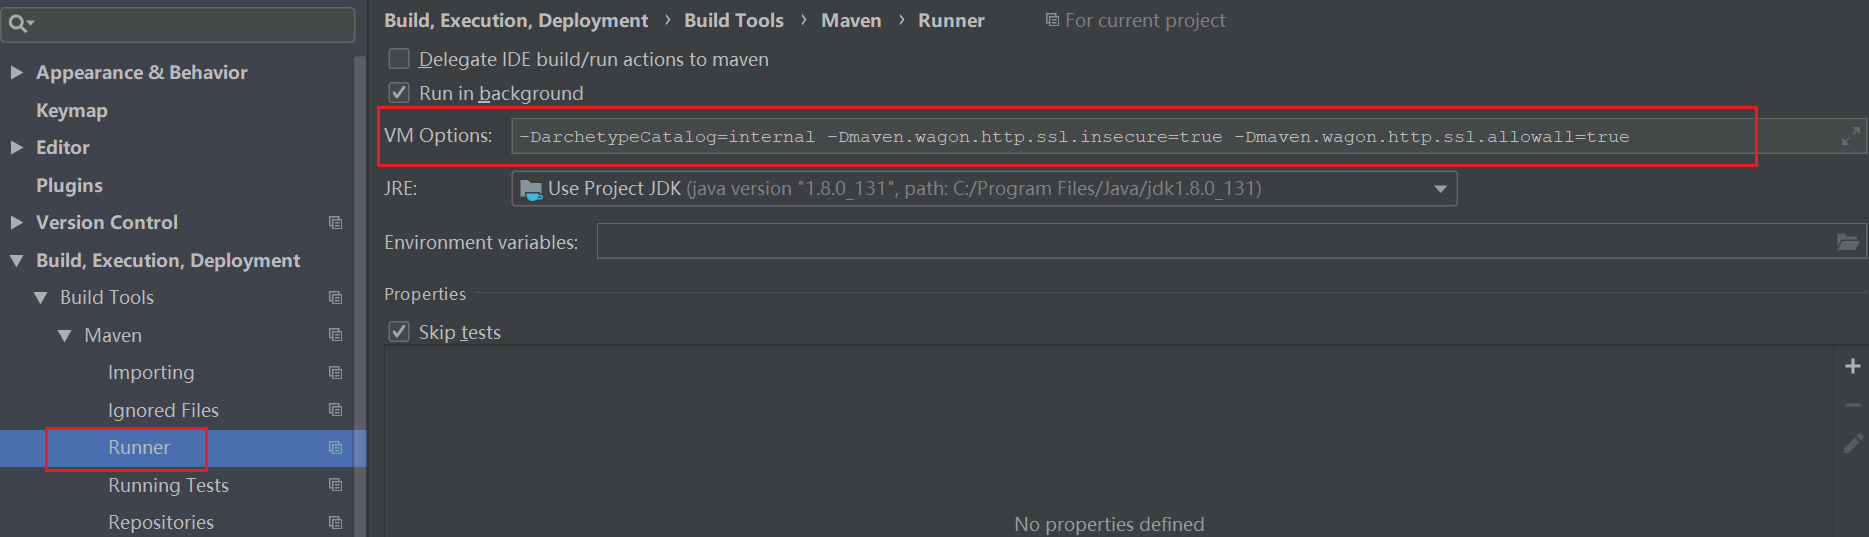
maven出现KIX path building failed
idea maven设置添加参数
1 | -DarchetypeCatalog=internal -Dmaven.wagon.http.ssl.insecure=true -Dmaven.wagon.http.ssl.allowall=true |
抽取出公用的api和实体类
- 新建一个moduel:cloud-api-common
- 将多个模块重复的代码抽取到这个模块
- maven clean instll ,将公用模块发布到仓库
- 其他module引入公用模块的坐标
80端口被占用
在window上,80端口被占用的2种情况:
- SQL Server Reporting Services (MSSQLSERVER) ,SQL Server的日志系统
- IIS服务
解决方法(SQL Server Reporting Services ):
- 使用命令netstat -ano|findstr 80查找使用80端口的程序,可以看到是pid=4的的程序
- 使用命令tasklist列出当前运行的所有线程,可以看到pid=4的程序竟然是system
- 使用命名services.msc进入服务端口,找到SQL Server Reporting Services (MSSQLSERVER),终止
解决方法(IIS):
- 使用管理员身份运行cmd
- 使用net stop http停止http服务
- sc config http start= disabled 注意,=后面的空格不可少
linux安装wget
- linux查看版本
1 | lsb_release -a |
- 根据linux版本下载wget命令
1 | http://ftp.sjtu.edu.cn/centos/7/os/x86_64/Packages/ |
- 安装wget
1 | rpm -vih wget-1.14-18.el7_6.1.x86_64.rpm |
如果已经安装了wget,还提示wget command is not found?
1 | 1.执行以下命令查询wge命令的路径 |
linux配置网卡
使用ipconfig查看ip信息
vim /etc/sysconfig/network-scripts/ifcfg-eth0
1 | DEVICE=eth0 |
yum
1 | # 查询包安装的位置 |
修改阿里的yum源
- 首先备份系统自带yum源配置文件/etc/yum.repos.d/CentOS-Base.repo
1 | mv /etc/yum.repos.d/CentOS-Base.repo /etc/yum.repos.d/CentOS-Base.repo.backup |
- 查看centos版本
1 | lsb_release -a |
- 下载yum源配置文件到/etc/yum.repos.d
1 | CentOS7 |
- 运行yum makecache生成缓存
1 | yum clean all |
linux安装JDK
下载rpm包,上传到linux服务器
rpm -ivh 安装包
rpm -qa | grep jdk 查找当前系统中安装的JDK包
rpm -ql jdk包名 | grep bin 查找JDK安装的目录
配置环境变量vim /etc/profile
1
2
3export JAVA_HOME=/usr/java/jdk1.8.0_271-amd64
export CLASSPATH=.:$JAVA_HOME/lib/dt.jar:$JAVA_HOME/lib/tools.jar
export PATH=$PATH:$JAVA_HOME/bin测试查看JDK版本 java javac
linux安装maven
打开maven的官网下载页,找到tar.gz压缩包,然后右键选择【复制链接地址】
回到Linux服务器中,创建一个maven目录,使用
wget命令将复制的链接进行下载。然后使用命令
tar -zxvf apache-maven-3.6.0-bin.tar.gz,将压缩包进行解压,解压后我们会得到一个apache-maven-3.6.0目录。我们cd进入到
apache-maven-3.6.0目录,然后执行命令pwd,显示maven的绝对路径。然后复制该路径执行命令
vim /etc/profile编辑环境变量文件。1
export MAVEN_HOME=/root/app/maven/apache-maven-3.6.0
将MAVEN_HOME追加到PATH环境变量中
1
export PATH=$PATH:$JAVA_HOME/bin:$MAVEN_HOME/bin
执行
source /etc/profile命令来更新刚才的配置。执行命令
mvn -version查看maven是否安装配置成功。
linux安装rabbitMQ
- 安装erlang,添加源vim /etc/yum.repos.d/erlang-solutions.repo
1 | [erlang-solutions] |
执行命令:
1 | rpm --import https://packages.erlang-solutions.com/rpm/erlang_solutions.asc |
安装erlang:
1 | yum install erlang -y |
验证是否安装成功:
1 | erl -version |

- 安装rabbitMQ
下载:
1 | wget https://github.com/rabbitmq/rabbitmq-server/releases/download/v3.7.14/rabbitmq-server-3.7.14-1.el7.noarch.rpm |
安装:
1 | yum install -y rabbitmq-server-3.7.13-1.el7.noarch.rpm |
安装过程中如果出现错误:
1 | Failed dependencies: socat is needed by rabbitmq-server-3.7.14-1.el7.noarch |
执行命令:
1 | yum install socat |
安装完成后在/usr/sbin目录下有4个关于rabbitMQ的命令:

- 启动rabbitMQ
rabbitmq-server start,当然也可以使用 rabbitmqctl statr_app 来启动
- 开启rabbitMQ界面管理
1 | rabbitmq-plugins enable rabbitmq_management |
- 添加账号,授权远程访问
默认帐号guest只能用于本地访问,要远程访问可添加用户授权
添加新用户:rabbitmqctl add_user ming 123456
给新用户添加tags:rabbitmqctl set_user_tags ming administrator
授权:rabbitmqctl set_permissions ming “.*” “.*” “.*”
查看rabbitmqctl 命令的使用:rabbitmqctl
- 重启
关闭:rabbitmqctl stop
启动:rabbitmqctl start_app
浏览器输入 ip:15672 进入登录界面,输入刚才创建的用户名和密码即可进入
- 开放端口,15672是web管理界面的端口,5672是MQ访问的端口
如果是阿里云的服务器,需要到安全组中开放5672和15672端口
linux安装nacos
确保先安装了JDK和Maven
上传tar.gz包到服务器,tar -zxvf xxx解压后,bin目录中运行
./startup.sh -m standalone
linux安装mysql
- 检查是否已经安装过mysql
1 | rpm -qa | grep mysql |
- 如果已经安装,执行删除命令
1 | rpm -e --nodeps mysql-libs-5.1.73-5.el6_6.x86_64 |
- 查询所有mysql对应的文件夹,删除相关目录或文件
1 | whereis mysql |
- 检查mysql用户组和用户是否存在,如果没有,则创建
1 | cat /etc/group | grep mysql |
- 下载mysql安装包
1 | wget https://dev.mysql.com/get/Downloads/MySQL-5.7/mysql-5.7.24-linux-glibc2.12-x86_64.tar.gz |
- 解压到/usr/local/mysql目录下
1 | tar xzvf mysql-5.7.24-linux-glibc2.12-x86_64.tar.gz |
- 在/usr/local/mysql目录下创建data目录
1 | mkdir /usr/local/mysql/data |
- 更改mysql目录下所有的目录及文件夹所属的用户组和用户,以及权限
1 | chown -R mysql:mysql /usr/local/mysql |
- 编译安装并初始化mysql,务必记住初始化输出日志末尾的密码(数据库管理员临时密码)
1 | cd /usr/local/mysql/bin |
- 编辑配置文件my.cnf
1 | vi /etc/my.cnf |
- 测试启动mysql服务器
1 | /usr/local/mysql/support-files/mysql.server start |
- 添加软连接,并重启mysql服务
1 | ln -s /usr/local/mysql/support-files/mysql.server /etc/init.d/mysql |
- 登录mysql,修改密码(密码为步骤5生成的临时密码)
1 | mysql -u root -p |
- 开放远程连接
1 | use mysql; |
- 设置开机自动启动
1 | 1、将服务文件拷贝到init.d下,并重命名为mysql |
Eureka
单机版Eureka服务端
- 导入maven依赖
1 | <dependencies> |
- application.yml配置文件
1 | server: |
- 启动类标明是eureka服务端
1 |
|
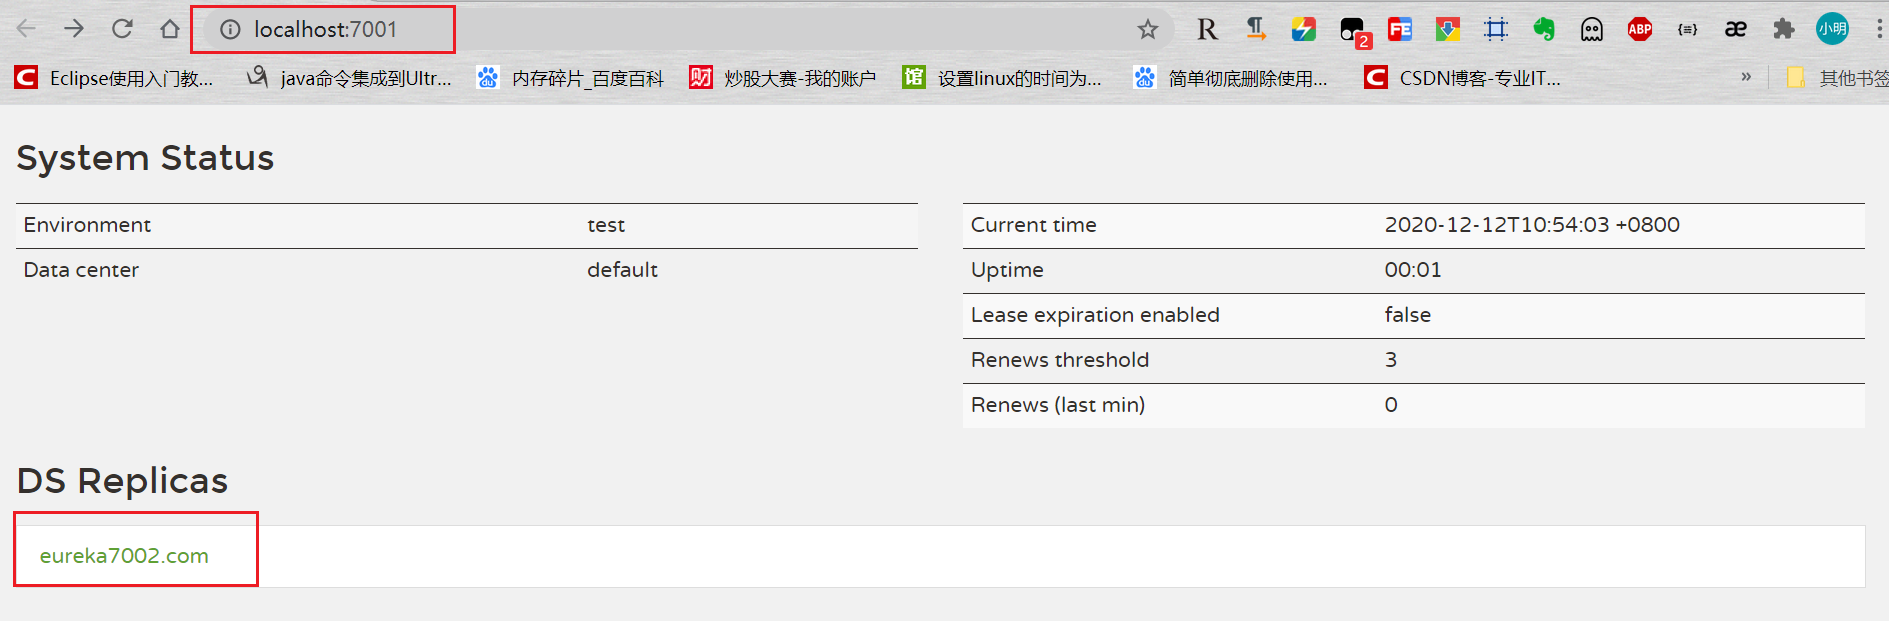
- 启动项目,访问服务器地址http://localhost:7001

单机版Eureka客户端
- 导入Eureka client依赖
1 | <!--eureka client--> |
- 修改application.yml配置文件,添加eureka client配置项
1 | eureka: |
- 在启动类上添加注解@EnableEurekaClient
1 |
|
- 先启动EurekaServer,再启动EurekaClient
必须先启动服务端,否则客户端连接会报错Connection refused: connect

单机版和集群版的比较
单机版本的Eureka会有单点故障的问题。
多台EurekaServer服务器之间的关系是怎样的?互相注册,相互守望
集群版Eureka服务器
所谓的集群版是指:有多台EurekaServer服务器,它们互相 注册,相互守望 。
创建的步骤和单机版的Eureka服务器很类似,由于它们要互相注册,相互守望,一个hostname满足不了。
所有,我们需要修改host文件将127.0.0.1本地映射成2个hostname。
- 修改host文件,C:\Windows\System32\drivers\etc
1 | # mcloud |
修改hosts不生效解决方法
直接修改hosts文件,一般情况下是保存失败的。需要保存到其他目录,在复制进C:\Windows\System32\drivers\etc目录,选择继续替换掉原来的host
如果还不生效,尝试刷新一下DNS缓存。使用命令ipconfig /flushdns
修改application.yml配置文件
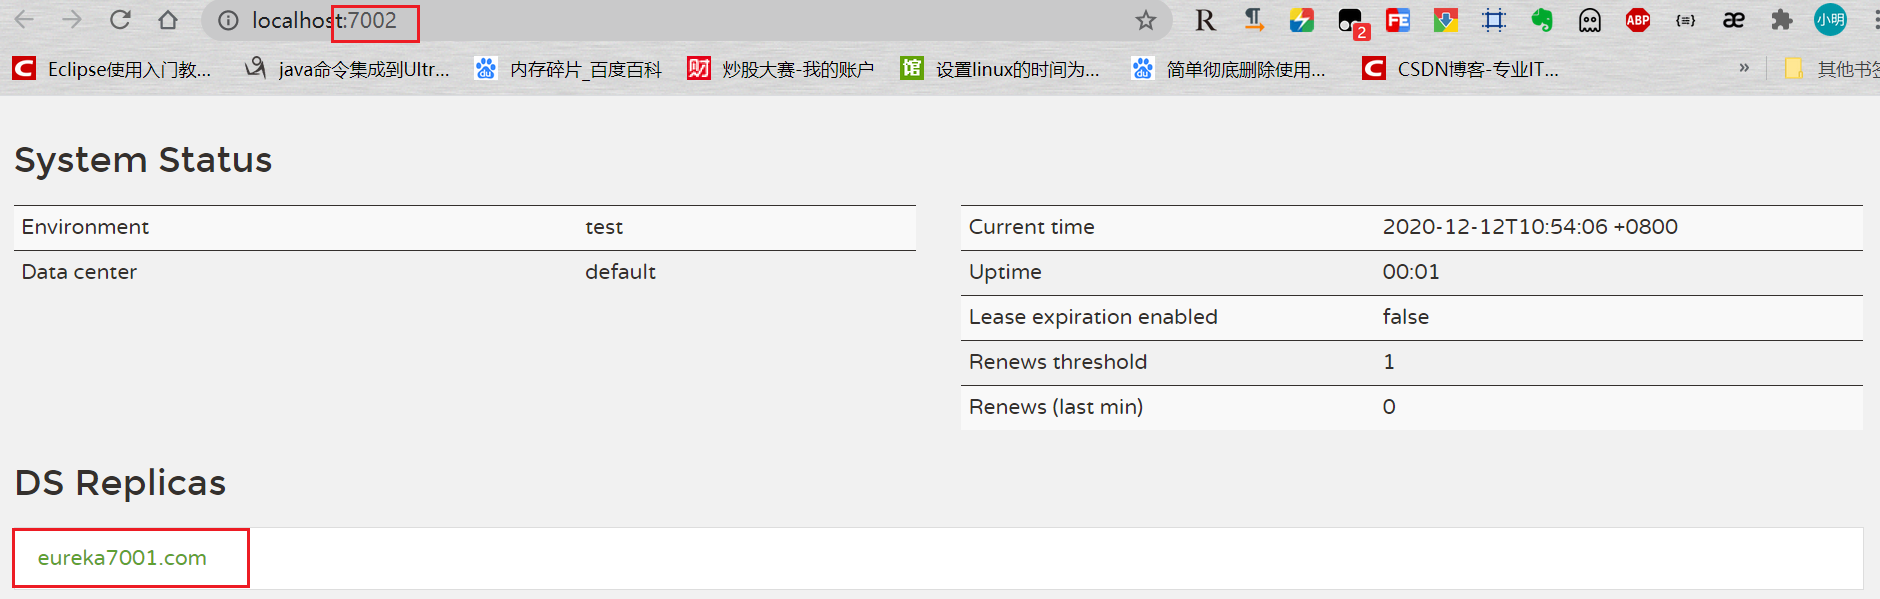
7001端口的EurekaServer:
注意hostname 和 service-url的配置:
1 | server: |
7002端口的EurekaServer:
1 | server: |
- 启动服务
集群版Eureka客户端
集群版的客户端主要是application.yml配置文件不同:service-url注册两个Eureka服务器的地址。
order:
1 | eureka: |
payment:
1 | eureka: |
集群版服务提供者
由于有多台服务器提供服务,它们都要向注册中心注册服务。
只是application.yml的配置文件不同:比如server.port不同
但是spring.application.name是相同的。集群版服务提供者暴露出一个相同的服务名称,但内部可能由多个端口提供服务。
1 | server: |
那么,服务使用者order80该怎么去访问集群版的服务提供者提供的服务呢?
只需要使用服务提供者暴露出来的服务名称。
如下,统一使用CLOUD-PAYMENT-SERVICE访问8001和8002提供的服务。
经过测试,通过访问服务提供者application.yml中配置的小写的cloud-payment-service也是可以的。
1 |
|
此时,如果使用order80去访问服务,会出现如下错误:
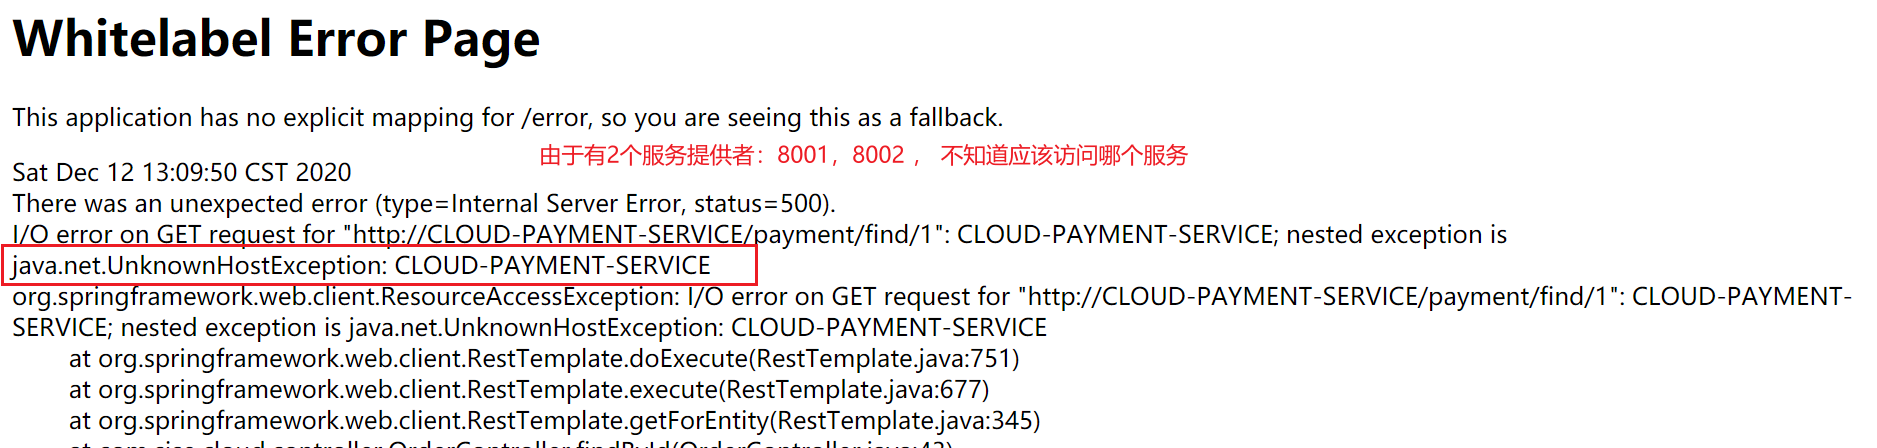
这是由于有8001和8002多个服务提供者,而order80不知道应该去访问哪个服务。
因为order80是通过restTemplate去访问的服务,应该配置restTemplate的负载均衡。
1 |
|
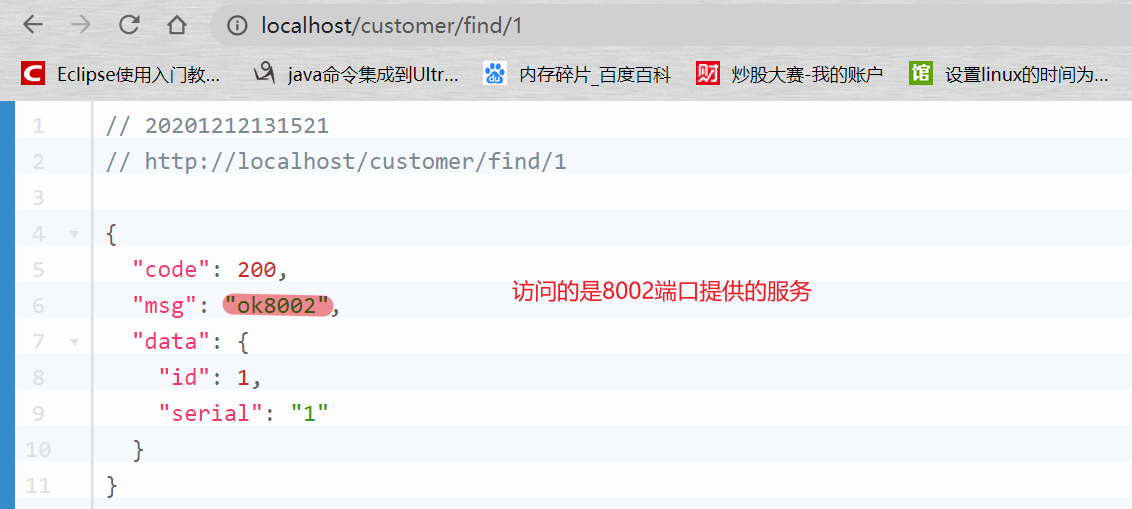
此时再使用order80去访问,就可以访问到服务了。
使用默认的负载均衡策略- 轮询。
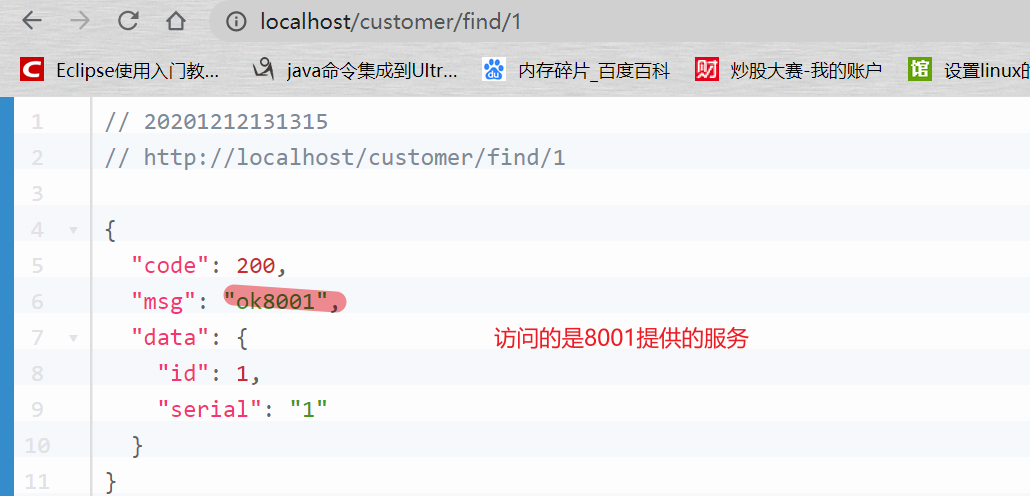
刷新一下,可能看到的:
微服务主机信息和ip信息的配置
- 配置前需要导入依赖
1 | <dependency> |
- 修改application.yml配置文件,设置instance-id 和 prefer-ip-address
1 | eureka: |

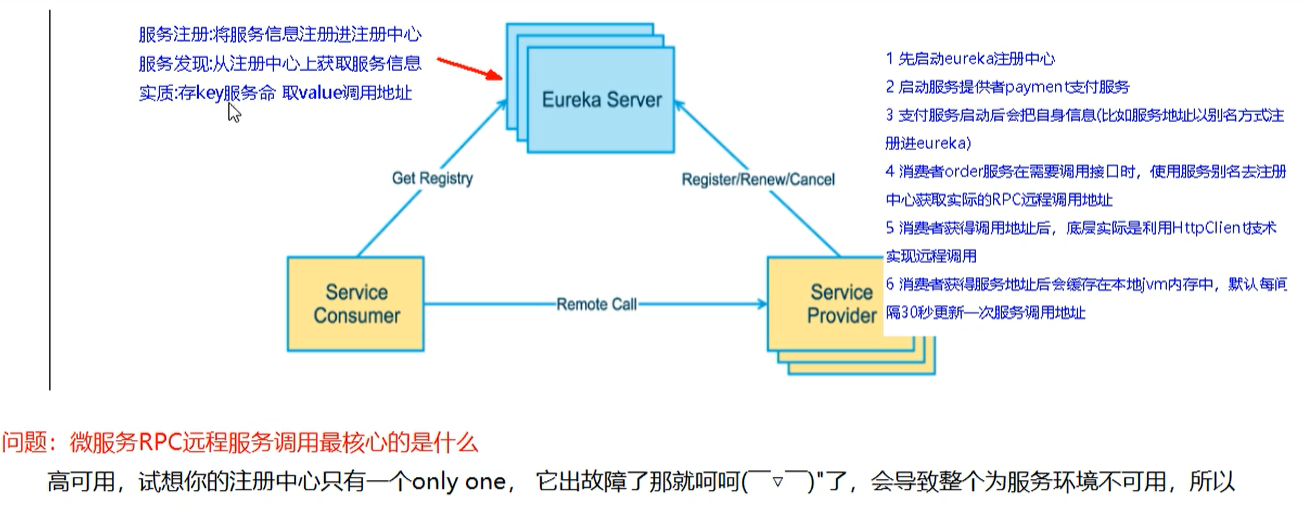
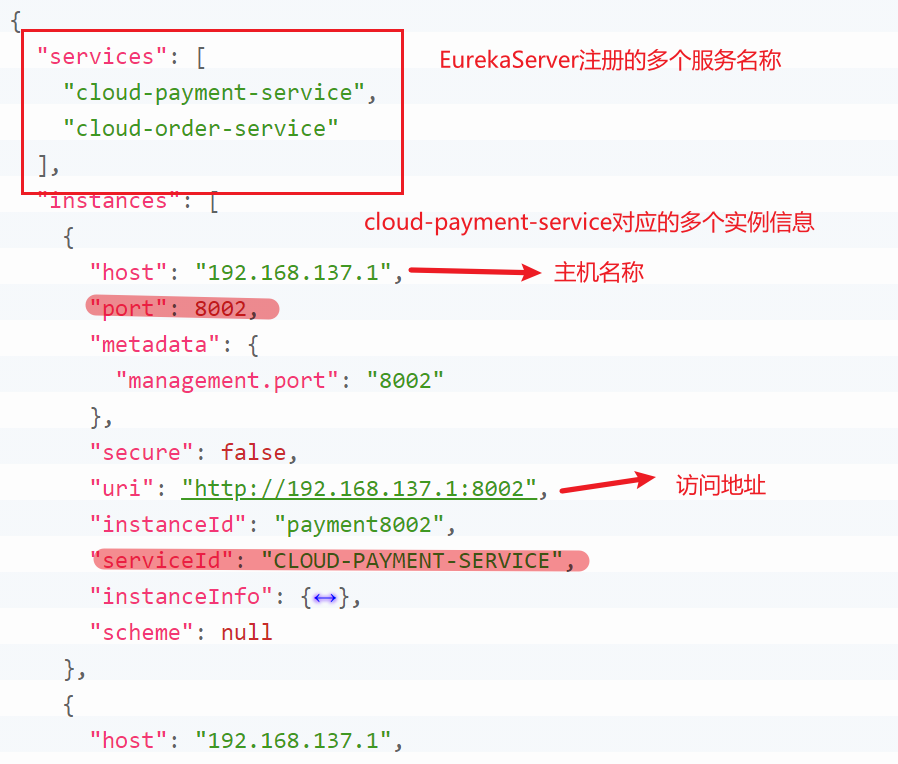
服务发现
对于注册进Eureka的服务,可以通过服务发现获取服务的信息。
- 注入org.springframework.cloud.client.discovery.DiscoveryClient类
1 |
|
- 启动类上添加注解@EnableDiscoveryClient,==新版的springboot已经自动配置,可以不用加这个注解==
1 |
|
输出结果:
自我保护
- 为什么需要自我保护的机制?
有时候,EurekaClient可以正常运行,但是与EurekaServer网络不通的情况,自我保护机制不会立刻将EurekaClient从服务注册表中删除。
- 什么是自我保护机制?
EurekaServer将会尝试保护其服务注册表中的信息,不再删除服务注册表中的数据,也就是不会注销任何微服务。
当某时刻某一个微服务不可用了(在一定时间内(默认90s)没有接收到某个微服务实例的心跳),EurekaServer不会立即清理,依旧会对该微服务的信息进行保存。
- 如何关闭自我保护机制?
EurekaServer的自我保护机制默认是开启的。可以在服务端的配置文件中设置:
1 | eureka: |
为了方便测试,设置EurekaClient发送心跳的时间间隔和服务器等待时间上限:
如下,每隔1s,客户端向服务器发送心跳。服务端在接收到最后一次心跳后,最长等待2s。
如果2s后没有再次接收到客户端的心跳信息,服务端又关闭了自我保护机制的话,客户端实例会被服务端从服务注册表中删除。
1 | eureka: |

Ribbon
引入spring-cloud-starter-netflix-eureka-client的时候就自动引入了ribbon
修改默认的负载均衡算法
实现自己的配置类,返回新的IRule实例。
注意,配置类不能放在启动类能扫描到的包或子包下。

1 |
|
- 在启动类上加上注解RibbonClient,指定配置类
1 |
|
Ribbon负载均衡算法
rest接口第几次请求数 % 服务器集群总数量 = 实际调用服务位置下标
每次服务重启后,rest接口计数从1开始。
使用自旋锁和CAS实现轮询算法:
- 定义接口,定义方法
1 | public interface LoadBalance { |
- 实现LoadBanlance接口
1 |
|
- 注入LoadBalance,调用服务
在调用自己实现的LoadBalance之前,记得去掉RestTemplate的@LocdBalance注解。
1 |
|
OpenFeign
基本使用
OpenFeign集成了Ribbon和RestTemplate,提供了一种接口+@FeginClient进行服务调用的机制。
- 引入maven依赖
1 | <dependency> |
- application.yml配置文件
此处不将其注册为EurekaService的服务,设置了register-with-eureka: false
1 | server: |
- 编写启动类,加上@EnableFeignClients
1 |
|
- 编写接口,加上@FeignClient
@FeignClient的name属性是服务提供者的服务名称。
接口中的方法与服务提供者Controller的方法相同,url也应该相同。
服务消费者的PaymentService:
1 | (name = "cloud-payment-service") |
服务提供者的PaymentController:
1 |
|
- 编写服务消费者的controller,直接调用PaymentService,不需要使用Ribbon
1 |
|
超时机制
OpenFeign的默认超时时间是1s,请求超出这个时间,会报timeout的错误。
设置超时时间:
由于OpenFeign底层是ribbon,设置的是ribbon的属性。
1 | ribbon: |
日志记录
OpenFeign提供了日志对接口的调用情况进行监控和输出。
日志级别:
- NONE:默认的,不显示任何日志
- BASIC:仅记录请求方法、URL、响应状态码以及执行时间
- HEADERS:除了BASIC定义的信息之外,还有请求和响应的头信息
- FULL:除了HEADERS中定义的信息之外,还有请求和响应的正文以及元数据
- 添加配置类,设置日志级别
1 |
|
- application.yml配置文件
1 | logging: |
Hystrix
基本概念
服务降级(fallback)
哪些情况会发生服务降级:
- 异常
- 超时
- 服务熔断
- 线程池/信号量打满
服务熔断(break)
类比保险丝达到最大服务访问后,直接拒绝访问,拉闸限电,然后调用服务降级
服务限流(flow limit)
秒杀高并发等操作,一秒钟N个,有序进行。
服务降级 -> 进而熔断 -> 限流
服务降级
- 引入依赖
1 | <dependency> |
- @HystrixCommand注解的使用
@HystrixCommand指定当发生超时或异常时,执行fallbackMethod指定的降级方法。
@HystrixProperty指定超时上限,当超过这个时间时,会执行fallbackMethod指定的降级方法。
1 | (fallbackMethod = "timeoutOrExceptionHandler",commandProperties = { |
- 启动类开启Hystrix
1 |
|
细节:
- fallbackMethod指定的方法可以放在controller层,但是指定的方法和@HystrixCommand必须在同一个文件,否则报错fallback method wasn’t found
- 若发生异常,异常并不会抛出,直接执行了fallbackMethod指定的方法
- 服务降级可以添加在服务器,也可以添加在客户端
- 若客户端和服务端都做了服务降级,优先执行客户端的降级方法
- fallbackMethod方法的参数要和对应的服务的方法形参类型一致
全局服务降级
为每一个方法写一个fallbackMethod真的是太麻烦了。我们希望有一个全局的方法,当我方法上没指定fallbackMethod的时候,使用全局的fallbackMethod方法,当方法上指定了fallbackMethod的时候,使用方法上指定的fallbackMethod方法。
- 使用@DefaultProperties在类上标记fallbackMethod
- 使用@HystrixCommand在方法上标记,当方法出现异常或超时,又没有指定fallbackMethod时,使用@DefaultProperties标记的fallbackMethod方法
1 |
|
全局服务降级可以为同一个类中的方法统一一个fallbackMethod,但是与类形成了耦合,无法在多个类中共用。
Feign支持的松耦合服务降级
当使用Fegin的时候,调用的方法都是来自一个标记了@FeignClient的接口,我们就可以利用这个接口结合Feign,对接口中的每一个方法实现一个fallbackMethod方法。
- 编写一个类实现提供服务的接口,并加入到容器当中
当在服务接口指定了fallbackMethod对应的类,而这个类没有加入到容器中时,启动的时候扫描不到,会报错
1 |
|
- 在服务提供接口指定fallbackMethod
1 | (name = "cloud-hystrix-payment-service",fallback = PaymentFallbackMethod.class) |
- application.yml开启Feign对Hystrix的支持
1 | feign: |
服务熔断
熔断机制是应对雪崩效应的一种微服务链路保护机制。当某个微服务出错不可用或者响应时间太长时,会进行服务的降级,进而熔断该节点微服务的调用,快速返回错误的响应信息。当检测到该节点微服务调用响应正常后,恢复调用链路。
在SpringCloud框架里,熔断机制通过Hystrix实现,Hystrix会监控微服务间调用的状况,当失败的调用到一定阈值,默认是5s内20次调用失败,就会启动熔断机制。
熔断机制的注解是@HystrixCommand.
下列代码表明:在10s内服务调用超过了10次,且失败了6次(60%),会启动熔断机制
1 | (fallbackMethod = "timeoutOrExceptionHandler",commandProperties = { |
三个重要参数:
- 快照时间戳:断路器统计一些请求和错误信息的统计时间范围,默认为最近的10秒
- 请求总数阈值:在快照时间窗内,必须满足请求总数阈值才有资格熔断。默认值是20,意味着在10秒内,如果调用次数不足20次,即使所有的请求都超时或其他原因失败,断路器都不会打开
- 错误百分比阈值:当请求总数在快照时间窗内超过了阈值,比如,发生了30次调用,而有15次调用失败,也就是50%的错误百分比,这时候断路器就会打开。默认值是50%
断路器开启/关闭的条件:
- 当满足一定请求阈值的时候(默认10秒内超过20个请求)
- 并且失败率达到阈值的时候(默认10秒内超过50%的请求失败)
- 到达以上阈值,断路器将会开启,所有的请求都不会进行转发
- 一段时间之后(默认是5秒),这个时间断路器是半开状态,会让其中一个请求进行转发,如果成功,断路器会关闭,若失败,继续开启,重复以上步骤
1 | 断路器的打开和关闭,是按照一下5步决定的 |
Gateway
服务搭建
- 引入依赖,注意gateway不需要引入web和actuator
1 | <dependency> |
- application.yml配置路由
1 | server: |
- 启动类
1 |
|
- 测试
1 | http://localhost:9527/payment/find/1 |
编码方式配置路由
1 |
|
通过微服务名实现动态路由
上面的uri配置是写死在application.yml文件中的,我们可以利用gateway的动态路由,通过微服务的名称,负载均衡的查找服务。
1 | server: |
当访问http://localhost:9527/payment/find/1的时候,通过负载均衡去查找8001或8002端口提供的服务。
Config
读取远程仓库的配置文件
- 引入依赖
1 | <dependency> |
- application.yml配置文件
- 配置中心无需配置name属性和profile属性,只有别的服务来访问配置中心时,别的服务才需要配置name属性和profile属性
1 | server: |
- 启动类
1 |
|
- 测试
假设github上存在以下两个配置文件:

通过浏览器访问:http://localhost:3344/master/config-prod.yml得到以下结果:
1 | config: |
或者通过http://localhost:3344/config-prod/master 得到JSON格式的返回结果:
1 | { |
如果访问的路径在远程仓库中不存在,会返回以下的结果:
1 | { |
如果访问的文件在远程仓库中不存在,会返回以下的结果:
1 | {} |
配置中心的搭建
以上只是单独创建了一个服务,去访问远程仓库的配置文件。
如果想让它成为配置中心,也非常简单,将其注册成为EurekaSerrver的一个服务即可。
1 | eureka: |
启动类上加入注解:
1 |
|
其他服务访问配置中心
其他服务不直接访问访问远程仓库获取配置信息,而是访问配置中心获取配置文件的信息。
- 引入依赖,config的客户端
1 | <dependency> |
- bootstarp.yml的配置文件
- config的客户端使用的配置文件是bootstrap.yml,而不是application.yml
application.yml 和 bootstrap.yml文件的区别:
application.yml bootstrap.yml 用户级别的资源配置项 系统级别,优先级更加高 上下文是ApplicationContext 上下文是BootstrapContext,是ApplicationContext的父上下文。BootstrapContext负责从外部源加载配置属性并解析配置,这两个上下文共享一个从外部获取的Environment
- Bootstrap有高优先级,默认情况下,它们不会被本地配置覆盖。
- Bootstrap和Application有不同的上下文,保证配置的分离
1 | server: |
- 启动类
1 |
|
- 编写测试Controller
1 |
|
上面的controller中直接从配置文件中读取配置信息,如果配置中心中不存在对应的配置中心,@Value读取失败,启动的时候就报错了。
- 测试
访问http://localhost:3355/configInfo,返回以下结果:
1 | mater branch,config-prod,version 1 |
如果访问http://localhost:3355/master/config-prod.yml,会报404
此时,我们修改远程仓库的配置文件,将version 1 改成 version 2:
1 | config: |
再次访问http://localhost:3355/configInfo,结果并没有刷新:
1 | mater branch,config-prod,version 1 |
如果访问[http://localhost:3344/master/config-prod.yml],返回结果是修改后的配置文件:
1 | config: |
也就是说,修改了远程仓库的配置文件,配置中心会立即刷新,而其他服务去访问配置中心,却不会刷新。
手动刷新其他服务的配置
- 引入actuator监控依赖
1 | <dependency> |
- 配置文件中暴露监控端口
1 | # 暴露监控端口 |
- 在需要刷新配置信息的类上添加注解@RefreshScope
1 |
|
- 利用actuator监控的特点,发生POST请求刷新服务
利用curl命令,发生POST请求到[http://localhost:3355/actuator/refresh].刷新3355这个端口的配置信息
1 | curl -X POST http://localhost:3355/actuator/refresh |
通过@RefreshScope和发生post请求去刷新,这种方式虽然可以刷新配置信息。但是这种方式不是最好的,如果有100个服务,需要手动发送100次POST请求(或许你可以使用脚本)。
由于100个服务都是从配置中心读取的配置文件,那么我们可不可以只刷新配置中心,让配置中心去刷新其他服务的配置信息呢?这就需要利用Spring Cloud Bus 。
Spring Cloud Bus
Spring Cloud Bus是用来将分布式系统的节点与轻量级消息系统链接起来的框架,它整合了Java的事件处理机制和消息中间件的功能。
Spring Cloud Bus目前支持RabbitMQ和Kafka。
基本原理
每个ConfigClient实例都监听MQ中同一个topic(默认是SpringCloudBus),当一个服务刷新数据的时候,它会把这个信息放入到topic中,这样其他监听同一topic的服务就能得到通知,然后去更新自身的配置信息。
那么,我们就有2种方案来实现配置信息的刷新:
- 通知ConfigClient中的其中一个客户端,这个客户端刷新数据的时候,会把更新的信息放入到topic中,其他客户端得到通知而更新自身配置
- 通知配置中心,由配置中心广播给其他客户端
我们采用通知配置中心的方案来更新配置信息,第一种方案有如下缺点:
- 打破了微服务的职责单一性,因为微服务本身是业务模块,它本不应该承担配置刷新的职责
- 破坏了微服务各个节点的对等性
通知配置中心,实现配置的自动刷新
- 配置中心引入actuator,rabbitmq依赖
1 | <!-- 添加消息总线RabbitMQ支持 --> |
- 配置文件中设置rabbitMQ设置,暴露监听端口
配置中心完整的配置文件如下:
1 | server: |
- ConfigClient也需要引入rabbitMQ依赖,并在配置文件中引入rabbitMQ的支持
ConfigClient完整的配置文件如下:
1 | server: |
- 测试
在远程仓库中修改配置文件信息后,发送POST请求通知配置中心,其他ConfigClient会收到配置中心的通知,从而更新自身的配置信息。
1 | curl -X POST http://localhost:3344/actuator/bus-refresh |
定点通知
所谓定点通知,即通知部分ConfigClient,而不是全部的ConfigClient。
1 | curl -X POST http://localhost:${serverport}/actuator/bus-refresh/${destnation} |
/bus/refresh请求不再发送到具体的服务实例上,而是发给配置中心,并通过destnation参数指定需要更新配置的服务实例。
这里的destnation实际上是服务名称(spring.application.name指定)+端口号。
比如上面的栗子,只通知localhost:3355这个服务实例更新配置:
1 | curl -X POST http://localhost:3344/actuator/bus-refresh/cloud-config-clinet-service:3355 |
Spring Cloud Stream
通信模型

Source和Sink
- 发送消息端(生产者)是Source
- 消息接收端(消费者)是Sink
Channel
队列的一种抽象,在消息通讯系统中就是实现存储和转发的媒介。
构建生产者
- 引入依赖
1 | <dependency> |
- 配置文件
生产者的配置文件:与stream整合需要一个binder,而binder指定消息服务的具体环境(比如使用rabbitMQ的host,username等)
rabbitmq的配置是写在spring内的。
1 | server: |
- 启动类
1 |
|
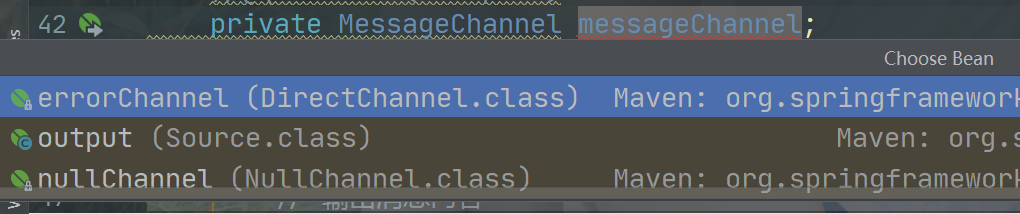
- Source类生产消息
1 | /** |
1 | MessageChannel有多个实现类,这里的output与配置文件中配置的需要一致。 |
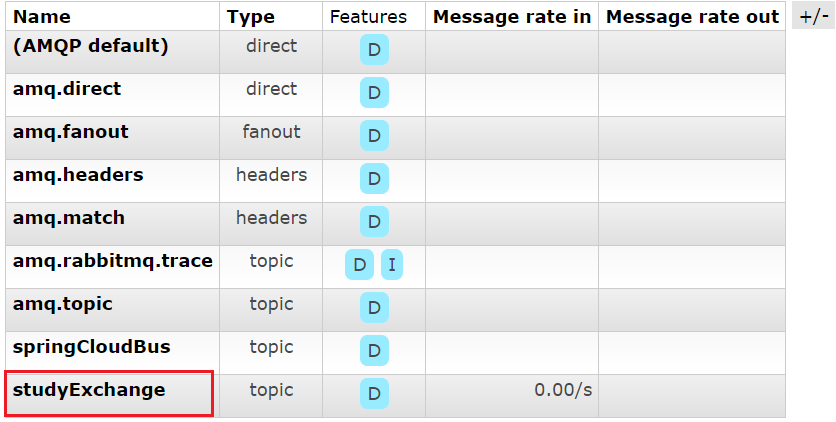
- 测试
登录rabbitMQ的管理界面,可以看到我们自定义的studyExchange:
构建消费者
- 引入依赖
1 | <dependency> |
- 配置文件
消费者主要是配置rabbitMQ的相关配置,并且配置从哪个Channel取出消息
1 | server: |
- 启动类
1 |
|
- 业务类取出消息
方法上使用注解@StreamListener,方法形参绑定发送者发送的消息类型。
1 |
|
- 测试
访问生产者http://localhost:8801/provide/send,产生一条消息:
1 | a9841d4e-5510-4395-ada5-53edad88b5f7 |
此时消费者8802接收到消息:
1 | 消费者:8802,获得的消息是:a9841d4e-5510-4395-ada5-53edad88b5f7 |
如果此时还有其他的消费者,比如消费者8803:
1 | 消费者:8803,获得的消息是:a9841d4e-5510-4395-ada5-53edad88b5f7 |
可见,生产者生产的一条消息,多个消费者都收到了,并且重复消费了。
分组解决重复消费问题
在Stream中,处于同一个group中的多个消费者是竞争关系,能够保证消息只会被其中一个消费者消费一次。
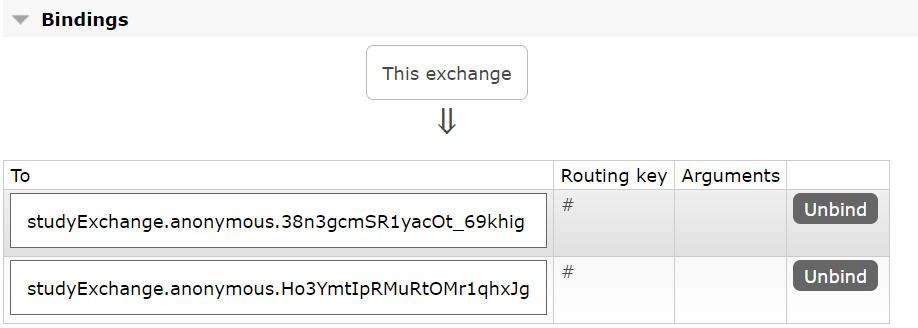
不同group是可以重复消费的。
查看rabbitMQ的界面,可以查看,默认情况下两个消费者属于不同的分组,因此它们可以重复消费。
我们可以为消费者设置相同的分组,解决重复消费的问题。分别在多个消费者的配置文件中配置group:
1 | # stream的整合配置 |
重启后,生产者生产一条消息,只会被同组内的一个消费者消费。
查看rabbitMQ管理界面也可以看到我们设置的分组生效了:
持久化问题
假设消费者的服务挂掉了,但是生产者还一直在生产消息,那么这么消息会被怎么处理呢?
- 如果指定了分组,这些消息会被持久化,当消费者重新启动的时候,这些消息会被消费
- 如果没有指定分组,这些消息会丢失
测试:
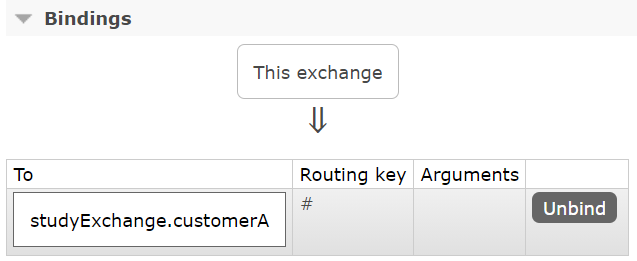
消费者8802不指定分组,消费者8803指定分组customerA。同时关闭消费者8802和消费者8803,访问生产者生产3条消息。重新消费者服务:
消费者8803指定了分组,一启动消费之前持久化的消息:
1 | 消费者:8803,获得的消息是:756d6ec3-23d3-4af4-93f3-5a650ca6ee67 |
而消费者8802重启之后,之前的消息丢失。
Sleuth
在微服务框架中,一个由客户端发起的请求在后端系统中会经过多个不同的服务节点调用来协同产生最后的请求结果,每一个前端请求都回形成一条复杂的分布式服务调用链路,链路中的任何一环出现高延迟或者错误都会引起整个请求最后的失败。而Sleuth就是用于追踪每个请求的整体链路。
基本使用
- 引入依赖
1 | <dependency> |
- 修改配置文件
1 | spring: |
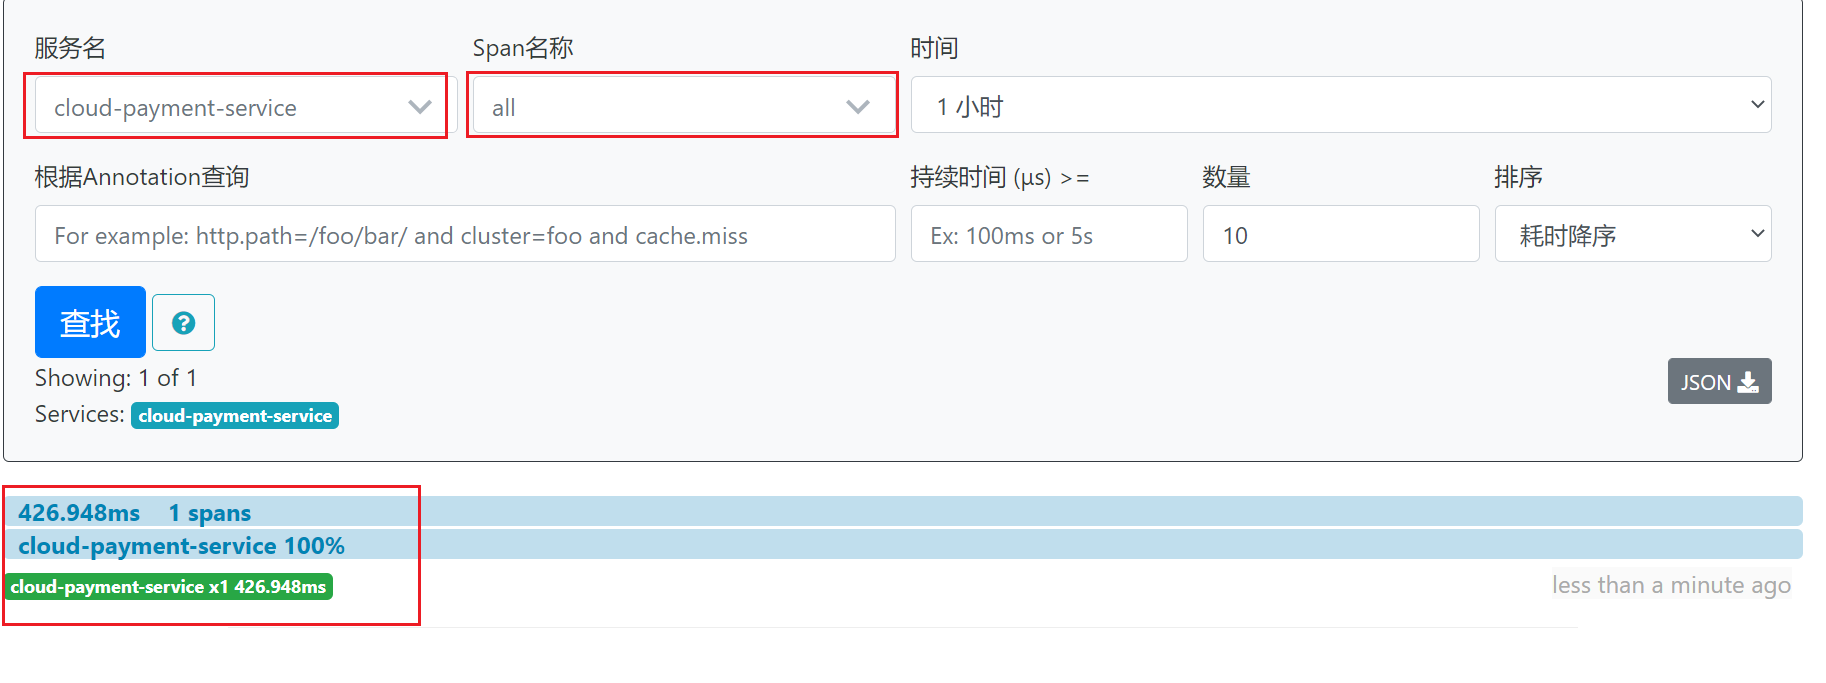
- 启动java -jar java -jar zipkin-server-2.12.9-exec.jar
这个jar包需要单独下载,这个jar就是图形界面的展示。
启动完成后,访问http://localhost:9411/zipkin/,可以查看链路。
span指的是访问的url。
Nacos
服务提供者搭建
- 导入依赖
1 | <dependency> |
- 配置文件
nacos不需要其他的服务注册模块了,不需要引入Eureka那一套了。
注意server-addr的写法,写成http://47.96.224.198:8848是不行的,启动会报错。
1 | server: |
- 启动类
1 |
|
- 测试
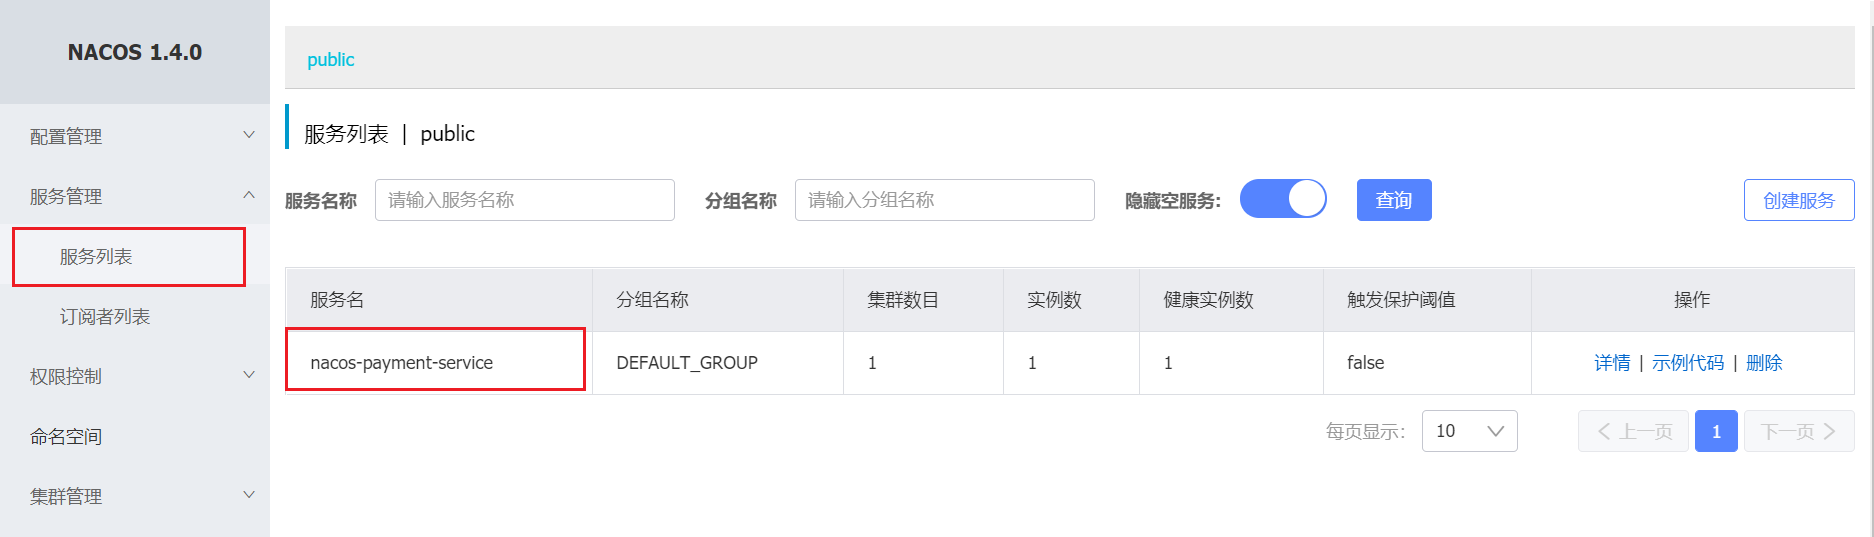
登录[http://47.96.224.198:8848/nacos],账户密码默认都为nacos。可以看到服务已经完成注册了。
访问http://localhost:9001/payment/nacos/1,返回结果符合预期。
服务消费者搭建
- 导入依赖
1 | <dependency> |
- 配置文件
1 | server: |
- 启动类
1 |
|
- 业务类
1 |
|
- 配置类
配置restTemplate,注意加上负载均衡的注解。
1 |
|
- 测试
打开nacos的管理界面,消费者order83已经完成注册。

访问http://localhost:83/order/nacos/1,返回结果预期。多次刷新页面,打印的端口也在变化,实现了负载均衡。
配置中心
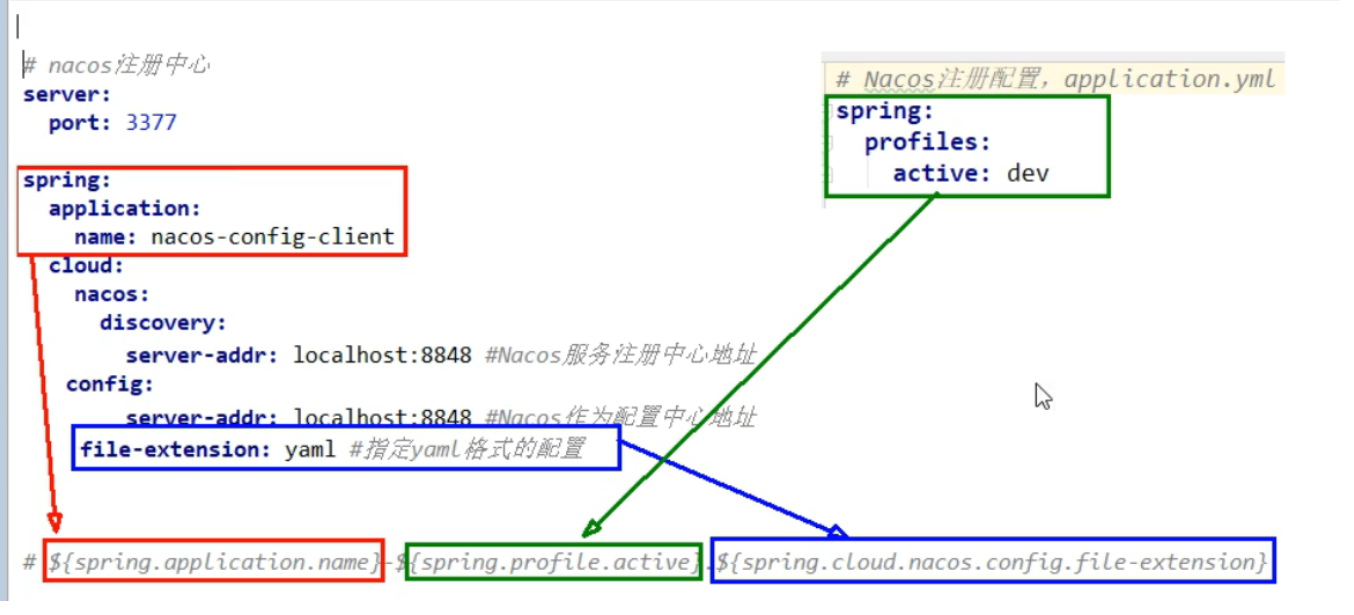
通过公式 ${prefix}-${spring.profiles.active}.${spring.cloud.nacos.config.file-extension} 从nacos中拉取配置。
prefix默认为spring.application.name指定的值,也可以通过spring.cloud.nacos.config.prefix配置
spring.profiles.active为当前环境对应的profile,(dev,prod,test等)
file-extension为配置内容的数据格式,可以通过spring.cloud.nacos.file-extension来配置
- 引入依赖
1 | <dependency> |
- 配置文件,bootstrap.yml 和 application.yml
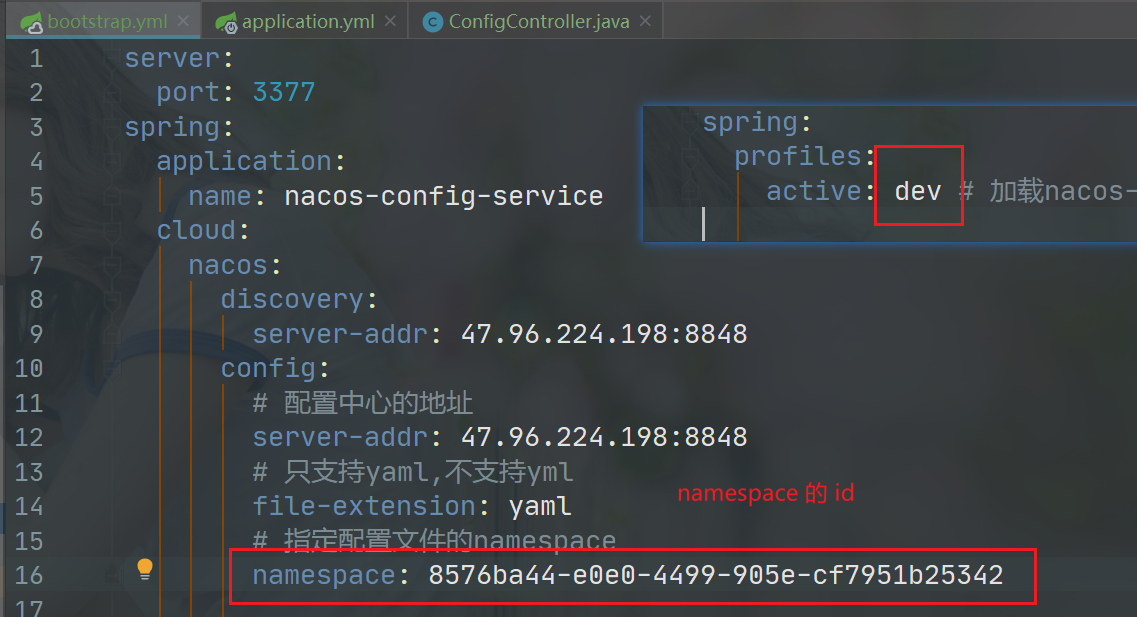
bootstrap.yml:
除了指定服务注册中心的地址之外,还需要执行配置中心的地址。
1 | server: |
application.yml:
1 | spring: |
- 启动类
1 |
|
- 业务类
通过Spring Cloud的注解@RefreshScope实现配置的自动刷新,与Spring Clound Config相比,不再需要发送post请求。
1 |
|
- 测试
在nacos的配置中心根据${profix}-${spring.profiles.active}.${spring.cloud.nacos.config.file-extension}创建配置文件:config-dev.yaml
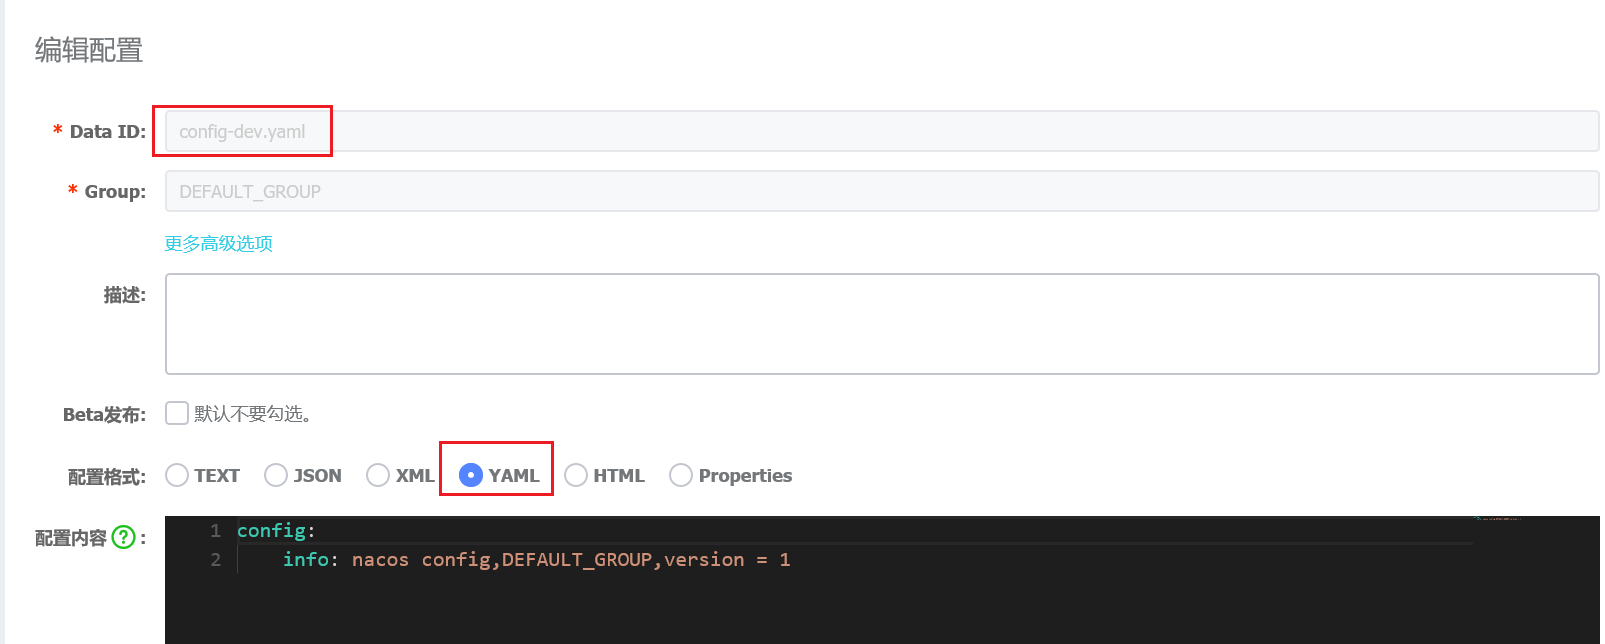
启动服务nacos-config-3377,访问http://localhost:3377/config/info,得到以下结果:
1 | nacos config,DEFAULT_GROUP,version = 1 |
从nacos的配置中心获取到了文件,尝试修改config-dev.yaml文件,将其version = 2
1 | config: |
不需要重启服务,不需要发送post请求,再次访问http://localhost:3377/config/info,配置信息自动刷新了,得到以下结果:
1 | nacos config,DEFAULT_GROUP,version = 2 |
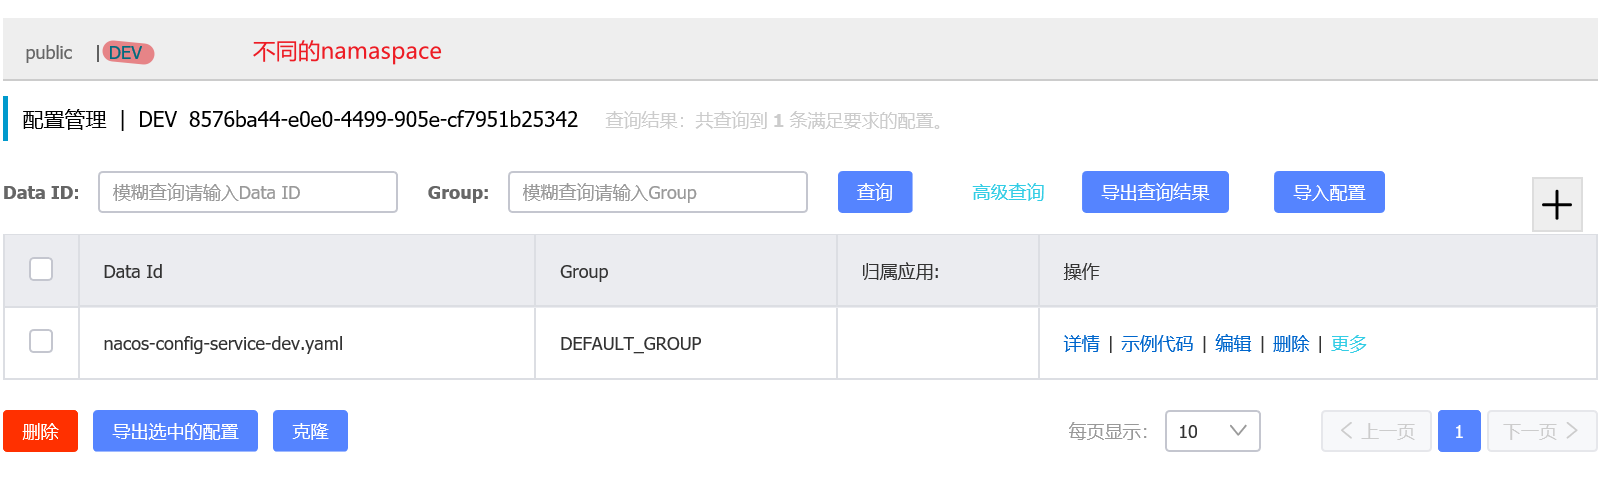
假设把配置文件中的prefix: config去掉,prefix默认值为${spring.application.name}的值,创建nacos-config-service-dev.yaml文件:
1 | config: |
此时,需要重启服务,重启后访问http://localhost:3377/config/info,得到以下结果:
1 | nacos config,DEFAULT_GROUP,version = 3333 |
配置的隔离
配置文件这里有namespace、group、DataId这3个概念,用来区分不同的环境。
namespace是可以用来区分部署环境的,Group和DataId逻辑上区分两个目标对象。
默认值:
namespace=public,group=DEFAULT_GROUP,默认Cluster(集群)是DEFAULT
Nacos默认的命名空间是public,namespace主要是用来实现隔离。比如说我们现在有3个环境:开发,测试,生产环境,我们就可以创建三个namespace,不同的namaspace之间是隔离的。
Group默认是DEFAULT_GROUP,Group可以把不同的微服务划分到同一个分组。
- 默认namespace + DEFAULT_GROUP + 不同的DataId
通过不同的DataId(即不同的配置文件名称),通过切换spring.profiles.active的值来切换不同的配置文件。

1 | spring: |
- 默认的namespace + 相同的DataId + 不同的Group

通过配置文件中指定的group属性,切换不同的配置文件:

- 不同的namespace + 相同的Group + 相同的DataId

通过配置文件中指定的group属性,切换不同的配置文件:
Nacos集群
Nacos默认使用嵌入式数据库实现数据的存储。所以,如果启动多个配置下的Nacos节点,数据存储是存在一致性问题的。为了解决这个问题,Nacos采用了集中式存储的方式来支持集群化部署,目前只支持MySql的存储。
Sentinel
基本使用
- 引入依赖
1 | <dependency> |
- 配置文件
1 | server: |
- 启动类
1 |
|
- 业务类
1 |
|
- 测试
sentinel默认是懒加载的,只有访问了url之后,页面才会有显示。

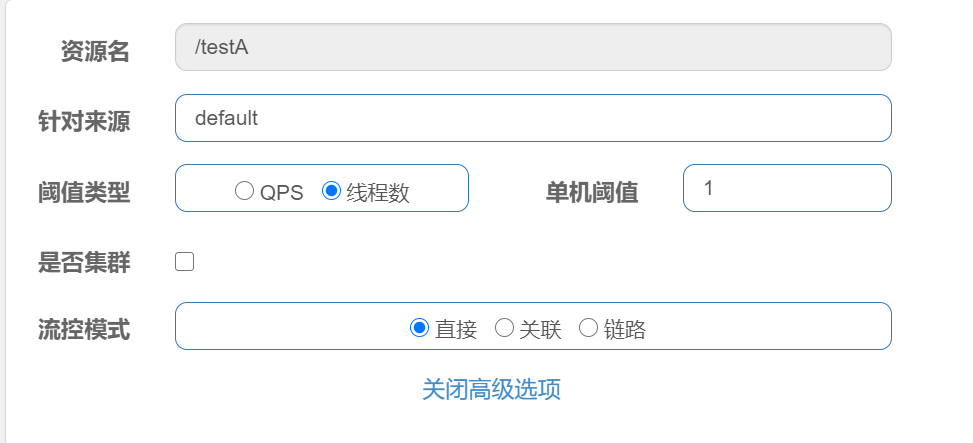
流控规则
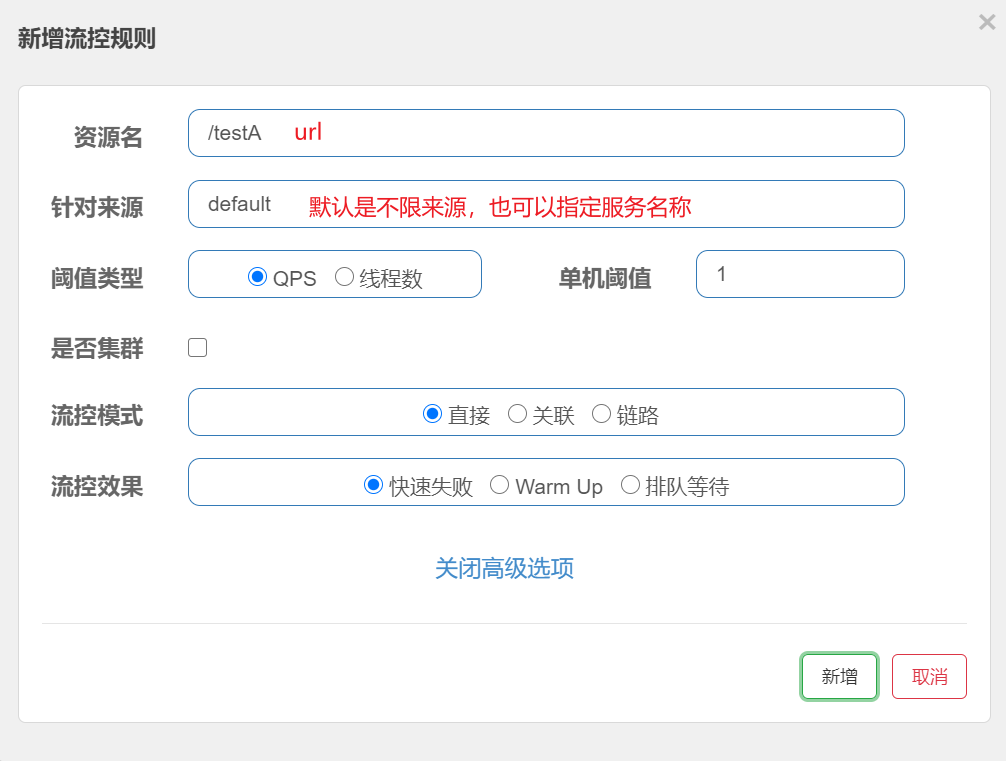
上面的配置表示,当访问/testA时,每秒钟的访问量超过1(阈值),后面的请求就直接失败,快速失败默认的处理方式是抛出异常。
1 | Blocked by Sentinel (flow limiting) |
这里有关QPS和线程数的说明:
- QPS:每秒的请求数量,和时间有关
- 线程数:跟线程的数量有关,当线程数量超过阈值,会进行限流
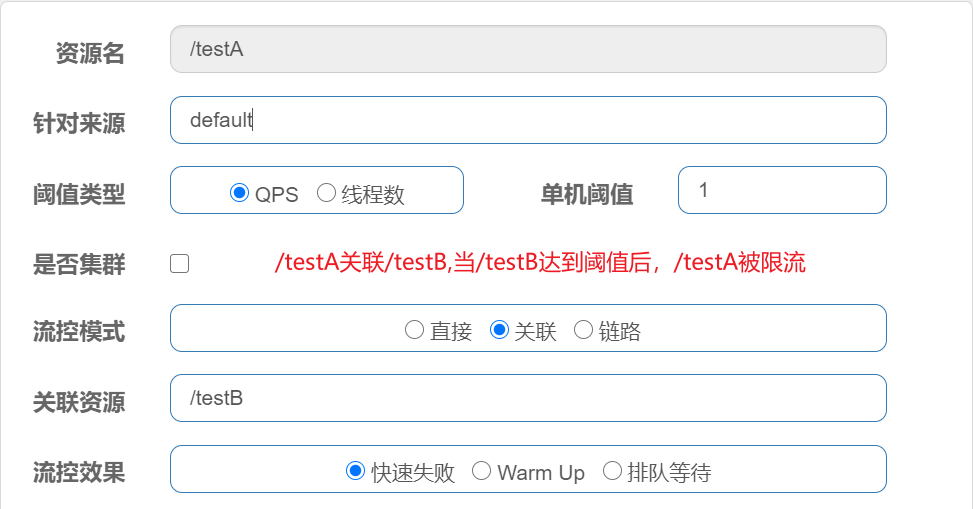
如果流控模式选择关联,当关联的资源达到阈值,就限流自己。
比如支付接口达到阈值,就要限流订单接口。
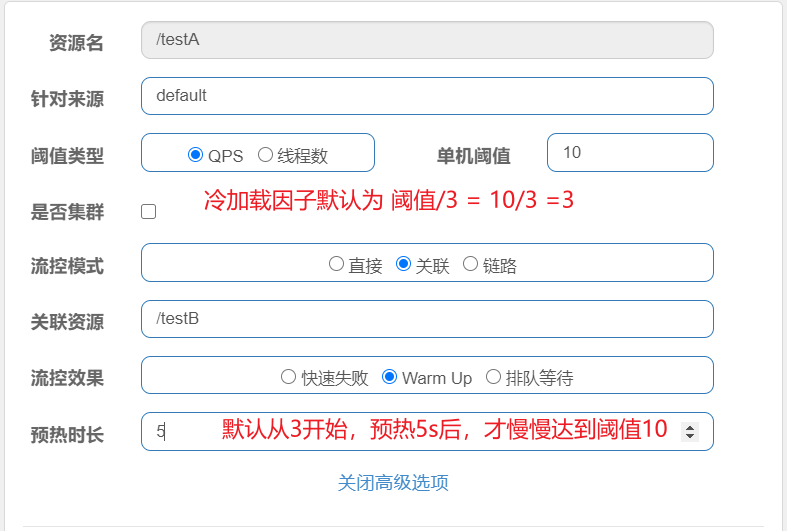
warm up:根据codeFactory(冷加载因子,默认3)的值,从阈值codeFactory经过预热时长,才达到设置的QPS阈值。
应用场景:秒杀系统在开启的瞬间,会有很多流量上来,很有可能把系统打死,预热方式就是为了保护系统,可慢慢的把流量放进了,慢慢的把阈值增长到设置的阈值。
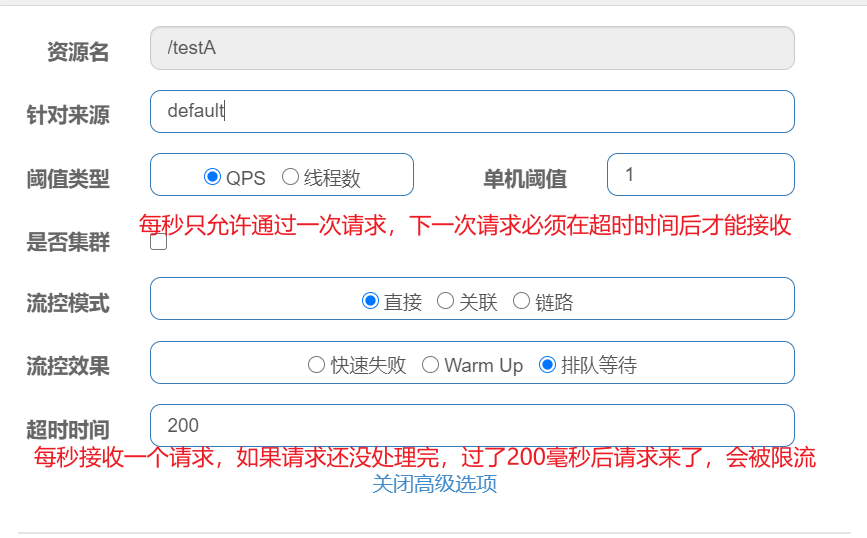
排队等待:让请求以均匀的速度通过,阈值类型必须设置成QPS,否则无效。
应用场景:用于处理间隔性突发的流量,比如消息队列。在某一秒有大量的请求到来,而接下来的几秒则处于空闲状态,我们希望系统能够在接下来的空闲期间逐渐处理这些请求,而不是在第一秒直接拒绝多余的请求。
SentinelResource
使用@SentinelResource可以自定义异常处理方法。类似于Hystrix的@HystrixCommand.
@SententinelResource的value属性可以指定资源名称,在sentinel界面配置流控规则的时候,可以使用资源名称,也可以使用url。
使用blockHandler属性指明自定义的处理方法。当/testA(testA)被限流的时候,会进入到自定义的处理方法。自定义处理方法可以绑定一个BlockException。标记@SentinelResource的方法形参有什么参数,自定义的处理方法也要有对应的形参。
1 |
|
为了代码的耦合性低,可以将自定义方法写在一个类中,使用blockHandlerClass属性指明自定义方法所在的类,blockHandler指明要处理的自定义方法。
只要标明了blockHandlerClass属性,就会到对应的类中去查找自定义方法,即使本类中指定了同名的自定义方法也无效。
1 |
|
CustomerHander是自定义所在方法的类。类中的自定义处理方法必须使用static修饰。
自定义处理方法类无需加入容器。
1 | public class CustomerHandler { |
如果在@SentinelResource内属性blockHandler没有识别到匹配的方法,会将属性fallback的内容替代blockHandler内容.
fallback指定的自定义方法上,异常对象绑定的是Throwable,如果绑定BlockException会报错。
1 |
|
小结:
标记@SentinelResource的方法形参有什么参数,自定义的处理方法也要有对应的形参。
类中的自定义处理方法必须使用static修饰。
如果在@SentinelResource内属性blockHandler没有识别到匹配的方法,会将属性fallback的内容替代blockHandler内容.
如果使用了@SentinelResource的value属性标记了资源名,流控规则不能配置为url的路径了。
如果出现了message not variable的错误,很有可能的自定义方法的形参绑定错误了。
流控规则不是持久化的,当重启了服务,配置的流控规则就会消失
标记@SentinelResource的方法不能是private
fallback和blockHandler
fallback指定的方法主要用来处理java中发生的异常,blockHandler指定的方法主要用来处理sentinel中规则的异常。
- 只指定fallback
如果只指定了fallback方法,发生java异常会执行fallback指定的方法。
如果此时又违反了sentinel的规则,sentinel默认快速失败抛出的异常也会被fallback捕捉到进行处理。
1 |
|
- 只指定blockHandler方法
如果出现java异常,没有fallback方法处理,会直接在浏览器页面抛出异常。
如果违反了sentinel配置的规则,会进入blockHandler指定的方法进行处理。
1 |
|
- 指定fallback和blockhandler
出现的java异常通过fallback指定的方法处理,违反sentinel规则的通过blockHandler指定的方法处理。
但如果同时出现java异常和违反sentinel规则,则blockHandler指定的方法优先级高于fallback指定的方法。
1 |
|
持久化配置
默认情况下,服务重启后,之前配置的流控规则等就会消失,可以将其保存到nacos持久化保存。
- 添加持久化依赖
1 | <dependency> |
- 添加配置
在配置文件中指明持久化的配置位于nacos配置中心的namespace、group、dataId等属性。
1 | server: |
- 在nacos配置中心添加文件

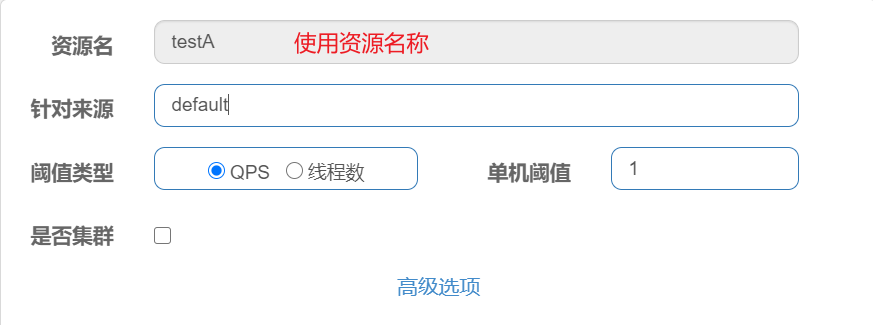
关于参数的介绍:
resource:资源名称,也可以指定url的路径
limitApp:来源应用
grade:阈值类型,0表示线程数,1表示QPS
count:单机阈值
strategy:流控模式,0表示直接,1表示关联,2表示链路
controlBehavior:流控效果,0表示快速失败,1表示Warm up,2表示排队等待
clusterMode:是否集群
seata
server端配置
- 修改file.conf和registry.conf文件
在进行文件修改之前,先备份。
file.conf:
1 | # transaction log store, only used in seata-server |
registry.conf:
1 | registry { |
- 执行sql,导入seata的3张表
创建一个数据库seata,这与file.conf文件中的指定属性相同。
导入db_store.sql
1 | -- the table to store GlobalSession data |
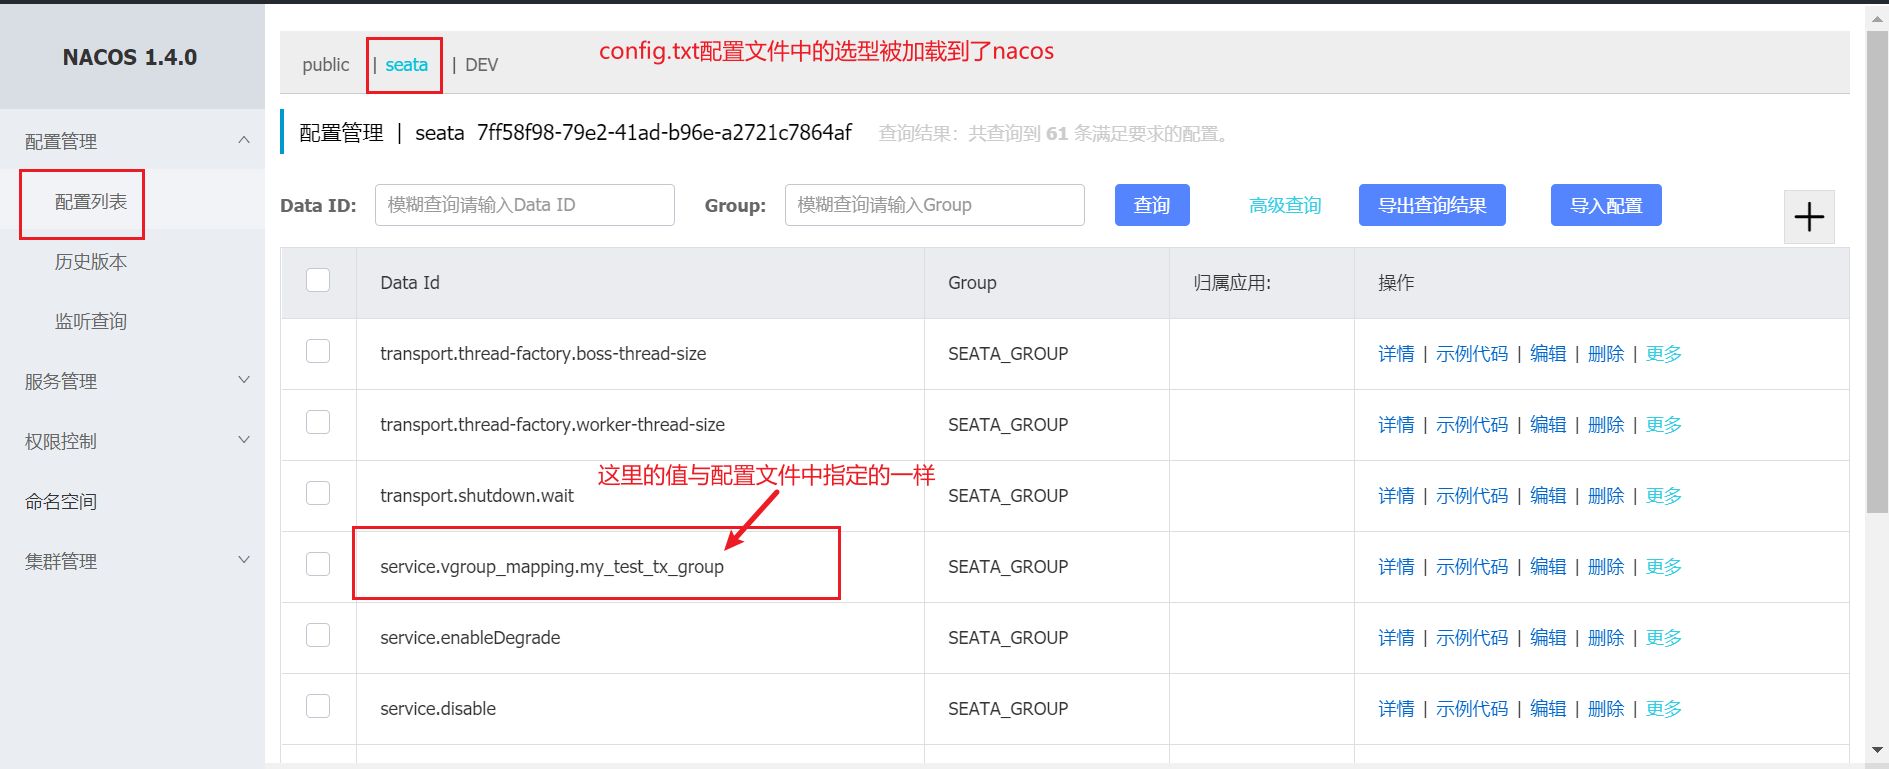
- 将配置文件导入nacos
config.txt是seata各种详细的配置,执行 nacos-config.sh 即可将这些配置导入到nacos,这样就不需要将file.conf和registry.conf放到我们client端的项目中了,需要什么配置就直接从nacos中读取。
config.txt:
1 | transport.type=TCP |
使用nacos-config.sh将配置导入到nacos的配置中心。
如果nacos-config.sh不是可执行文件,需要增加权限 chmod 777 nacos-config.sh
config存放的目录位于nacos-config.sh的上一级目录。
- config.txt : /usr/local/seata/seata
- config-config.sh : /usr/local/seata/seata/conf
1 | sh nacos-config.sh -h localhost -p 8848 -g SEATA_GROUP -t 7ff58f98-79e2-41ad-b96e-a2721c7864af |
参数说明:
-h: host,默认值 localhost
-p: port,默认值 8848
-g: 配置分组,默认值为 ‘SEATA_GROUP’
-t: 租户信息,对应 Nacos 的命名空间ID字段, 默认值为空 ‘’
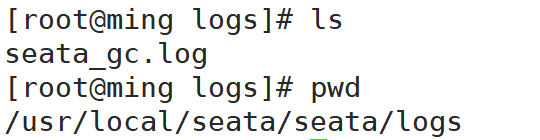
- 创建logs文件夹
在/usr/local/seata/seata目录下创建文件夹logs,并在logs下创建seata_gc.log文件
- 启动seata
在bin目录下./seata-server.sh启动。
如果启动的时候报内存不足的错误,可以修改seata-server.sh文件,修改其中一行的配置。
1 | exec "$JAVACMD" $JAVA_OPTS -server -Xmx256m -Xms256m -Xmn256m -Xss512k |
出现以下提示说明启动成功:

此时,查看nacos:
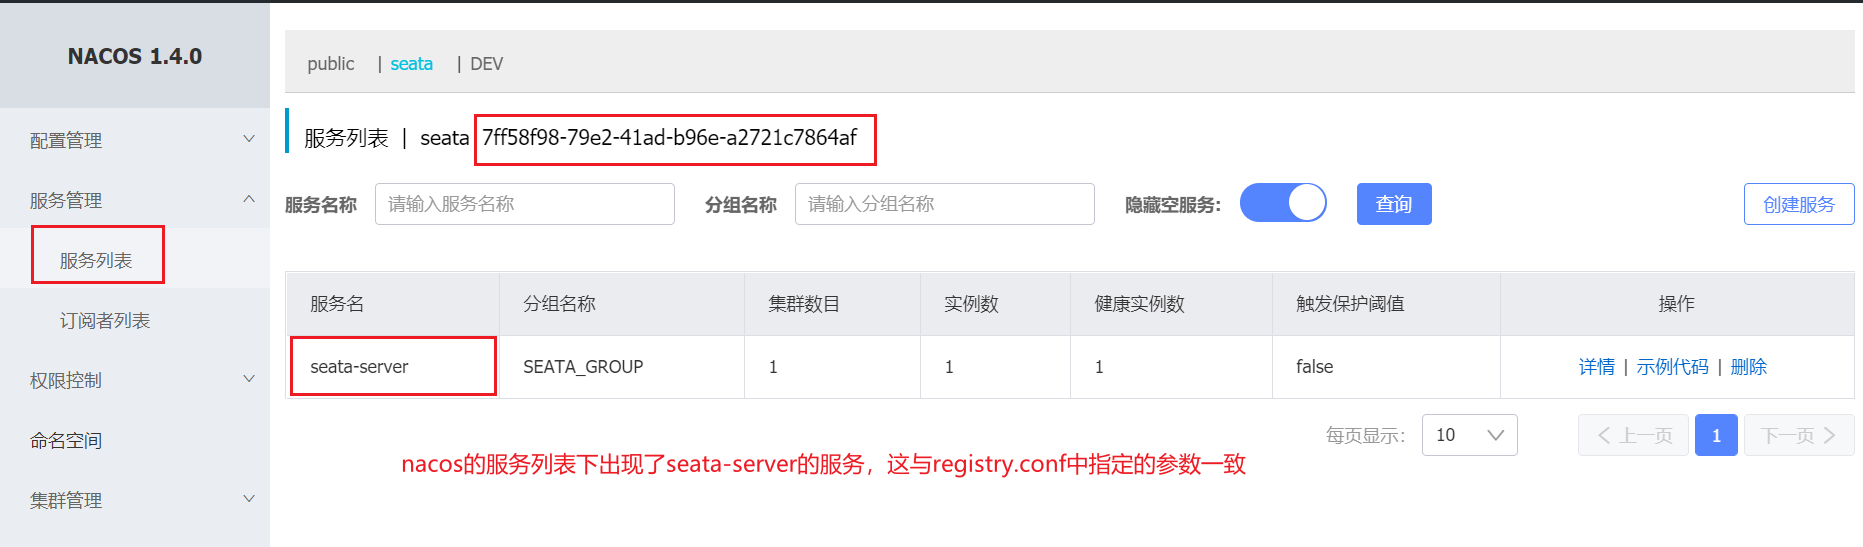
registry.conf的其中一段配置:
1 | nacos { |
查看nacos的配置中心:
client端配置
- 需要使用seata的客户端需要引入依赖,版本依赖于父级POM
1 | <dependency> |
- 导入undo_log
- springboot配置文件
1 | seata: |
方法一 你可以通过file.conf来配置使用环境
file.conf如以下修改
vgroup_mapping.xxxx-fescar-service-group = “default”
xxx是你的application名
方法二 通过环境变量改变使用环境配置
在启动脚本追加以下命令
export SEATA_CONFIG_ENV=default
registry.conf 对应的是 default
registry-dev.conf 对应 dev开发环境
registry-test.conf 对应 test测试环境
registry-prod.conf 对应 prod生产环境
